Table of Content
Grab the shears or scissors and cut the twine several inches longer than you need it. You will slip a piece of ribbon through the loops to tie the crown shut. To create a royal crown, use gold glitter glue, and blue, red, green, or purple gem stones. Cut out various shapes from colorful paper scraps and glue them around your crown for a truly inexpensive yet charming paper crown. Line the base of the crown with a long strip cut from gift wrap paper or any kind of colorful paper. Print out your chosen crown template on gold, silver, or any colored A4 or Letter size cardstock.
You can decorate your crown any way you choose! Use markers, crayons, or colored pencils to make cool designs. Bedazzle your crown with your gems and sequins! Cut out a strip of cardboard or fabric that is the length of the crown and 1 to 1.5 inches wide. Line up the bottom edge of the strip with the bottom edge of the crown.
Featured Crafts
Then you can easily collect it all again by folding the paper into a cone and pour it back into the bag. Try using a pink headband to make your princess crown stand out. Glue your crown to a headband to make it more secure. Paper is pretty flimsy, and the crown might not sit on your head the way you want it to. Grab a plastic headband that fits your head and line up the front piece of the crown with the headband. Attach the crown to the headband with hot glue and let it dry for about 10 minutes.

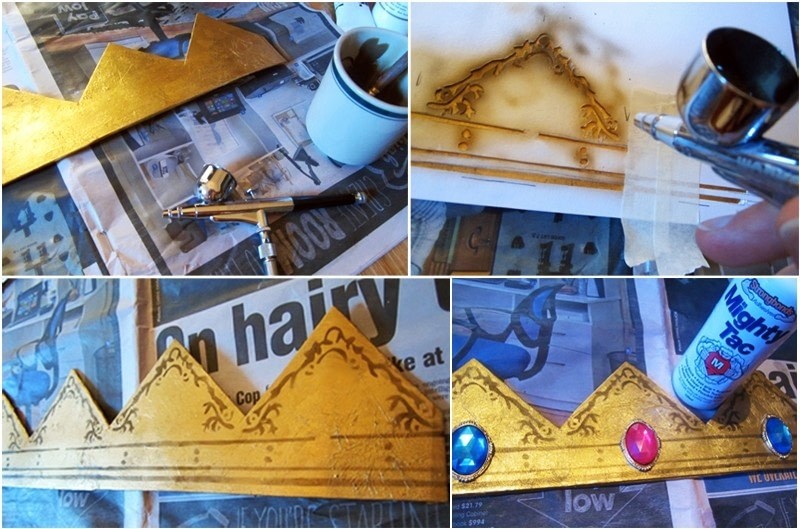
Use masking tape and wrap it around these 4 layers of wire to keep them stable while you wrap wire around them in the next steps. Begin by determining the measurements of your child’s head. I know Birdie’s head is around a 21″ circumference, so I actually made the crown that size as well. It sounds big, but I wanted it to sit down on her head , versus perching on top of it. Glue or use tape to adhere the strip to one side of the crown. It’s a good idea to test where to stick the second side, by first measuring the crown and strip around your child’s head.
Life & Style
If you want your crown to be a special color , paint it first using spray paint or acrylic paint. Let the paint dry, then trace it, then cut it out. If you are looking for a template for a royal crown, look for templates with jagged shapes. To cut glitter cardstock on your Cricut Explore, set your smart dial to ‘Custom' and then the drop-down menu will include Glitter Cardstock.
If you want to color or paint your crown, go with white cardstock. Of course you can also create crowns inspired by your favorite princesses. Just look at this gorgeous design made from the idea of Snow White and her gorgeous colors.
Decorating the Crown
It’s quite special and perfectly festive for any celebration. Kids can customize their DIY princess crowns with their choice of crayons, markers, or gems and rhinestones like we did. With your 14 gauge wire, create a U-shaped piece of wire that will fit the circumference you need. Then double-back on itself 3 times, so you have a crown base that is 4 pieces of wire thick. Do not cut the wire to do this, but use one continuous piece. Take a look at the 2nd to last photo to see how the ends of the crown should look at the back.
But, attach them to a clip or a headband and you’ve got a new, tiny glitter piece for your tiny princess. Can you believe this beauty was made from tissue paper? Follow this tutorial to learn how to create a magical piece that tops off your little princess. If the little girl in your life loves Sleeping Beauty, you can create a plethora of Aurora crown just by using its simple pattern. If you’re a veteran crafter, you may be more inclined to try this project out. Made from wire, you’ll have a super chic, modern design on your hands to play with.
Glue on glitter and rhinestones to make your crown sparkle. Grab a few large fake jewels, rubies, and rhinestones. Arrange them in the center of your crown to make it look expensive, then glue them down with hot glue to keep them secure. Trace your template onto a sheet of poster paper. Choose some poster paper or cardstock in the color that you want your crown to be. Set your stencil out on the paper and trace it with a pencil.
These princess crowns are designed to print on standard A4 paper. As paper crowns are a little flimsy, the crowns will be sturdiest if you make them from cardboard. So it might be a good idea to either print on paper and stick onto cardboard or print directly onto some card stock. The full-color princess crown is ready to wear once printed or you can design and create your own dazzling crown using the black and white outline. Do you have a little one who loves dressing up as a princess?
Connect the ends of your DIY Princess Crown together and use your easy craft adhesive. Use two clips to secure the ends together so that it will ensure that they'll stay adhered. For the zigzag crown, cut out each rectangle then cut along the zigzag line to come up with 4 crown sections. Set one crown section aside since you only need 3 to make a crown. Your daily dose of crafts, recipes, beauty, fashion, living tips and home guides.

Try using sparkly paper for an extravagant princess crown. For the best results, use colored paper when printing out your crowns. We used light yellow, pink, and purple paper.
Between each point I wrapped the wire around the base a couple of times. I also alternated wrapping front to back and back to front, to make them a little bit sturdier. Hi, I'm Petro, author and founder of Easy Peasy Creative Ideas. Sewist, crafter, avid DIY-er, foodie, photographer, homemaker and mommy to one.
Before you put your pieces together, leave them on a flat surface for about 1 hour to let all of your decorations dry. That way, you can make sure they’re secure before you put the crown on your head. Attach pom poms to the points of your crown to make them stand out. Find a few small pom poms and put them on the very tip of your crown points. Use hot glue to stick the pom poms onto your crown for a fuzzy, whimsical addition. Princess Mary, her husband Frederik and their children were spotted in the coastal Sydney suburb of Bondi on Tuesday.
More Ideas
Hannah enjoys writing articles about conservation, sustainability, and eco-friendly products. When she isn’t writing, you can find Hannah working on hand embroidery projects and listening to music. This article has been viewed 172,660 times. Set the pieces aside to let them dry completely.
Once the glue sets, try on your paper crown. These tiny little cuties are perfect for smaller princesses or even used as party favors! Attached them to clips or even headbands to make them easier to wear. I usually buy the gold glitter in packets at the local stationary store. Remember to keep a thin piece of paper underneath when you pour it onto the glued crown.


No comments:
Post a Comment